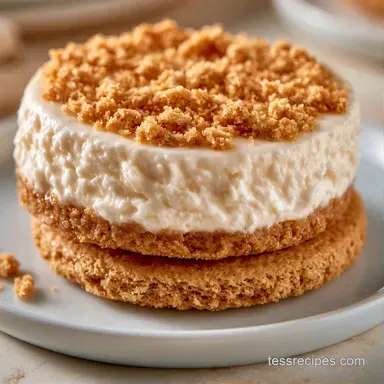
Mini No Bake Cheesecakes with Graham Cracker Crust

- Time: 25 min active + 4 hours chilling
- Flavor/Texture Hook: Rich buttery base with a cloud-like, creamy center
- Perfect for: Summer parties, baby showers, or easy meal prep
The aroma of crushed graham crackers and melted butter always hits me first. It's a sweet, nostalgic fragrance that brings the vibe of a summer carnival right into the kitchen. I once attempted a full-sized cheesecake that split wide open in the center, which was a complete disaster.
That experience led me to these mini versions. They're simply more enjoyable to serve and much easier to put together. Skipping the oven temperatures and water baths is a huge relief in my book.
These Mini No Bake Cheesecakes are the ultimate choice for anyone craving something elegant without the stress. You get a smooth, luxurious filling that practically melts on your tongue, finished with a bright pop of fresh fruit.
Mini No Bake Cheesecakes
The Temp Trick: Using room temperature cream cheese means it blends with the sugar without leaving any tiny white lumps.
The Air Factor: Folding in stiff peaked whipped cream traps tiny bubbles, which gives the dessert its lift since we aren't using eggs or heat.
| Method | Time | Texture | Best For |
|---|---|---|---|
| No Bake | 25 min active | Light & Airy | Hot days/Quick prep |
| Classic Baked | 1 hr active | Dense & Rich | Holiday dinners |
Essential Gear for the Job
You won't need much equipment, though a couple of items will simplify things. While a basic muffin tin is essential, I suggest adding paper liners. They ensure the treats release from the pan effortlessly.
To prepare the filling, a hand mixer or a stand mixer (such as a KitchenAid) is ideal. The motorized power is necessary to whip the heavy cream to the perfect texture. For a more polished, professional appearance, use a piping bag, although a regular spoon is perfectly adequate.
Shopping List Breakdown
| Ingredient | What It Does | Best Swap |
|---|---|---|
| Cream Cheese | Provides the base structure | Mascarpone (richer, milder) |
| Heavy Cream | Adds air and stability | Full fat coconut cream (vegan) |
| Graham Crackers | Creates the crunchy base | Digestive biscuits (more buttery) |
| Powdered Sugar | Sweetens and smooths | Sifted icing sugar |
For the crust: - 1.5 cups graham cracker crumbs Why this? Classic honey flavor and great crunch - 0.25 cup granulated sugar - 6 tbsp unsalted butter, melted
For the filling: - 16 oz full fat cream cheese, softened Why this? Full fat prevents the filling from leaking - 0.5 cup powdered sugar, sifted - 1 tsp vanilla extract - 1 cup heavy whipping cream, chilled Why this? Chilled cream whips faster and holds peaks
For the garnish: - Fresh berries - Fresh mint leaves
Recipe Specs and Tips
| Goal | What to change |
|---|---|
| Tarter taste | Add 1 tsp lemon juice |
| Extra sweetness | Increase powdered sugar by 2 tbsp |
| Crunchier base | Toast crumbs for 5 mins |
Chef's Note: If you're struggling to get your cream to stiff peaks, try chilling your mixing bowl in the freezer for 10 minutes before you start. Cold equipment is the magic trick for stable whipped cream.
Bringing It Together

1. Building the Foundation
Combine the graham cracker crumbs, sugar, and melted butter in a bowl. Stir everything until the mixture looks like wet sand. Spoon roughly 2 tablespoons of the crumbs into each lined muffin cup. Use a flat bottomed glass to press the crumbs down firmly until the base is level and compact.
Set these aside to firm up.
2. Creating the Cloud Like Filling
In a large bowl, beat the softened cream cheese and powdered sugar on medium high. Keep going until the mixture is smooth and glossy. Stir in the vanilla extract. In a separate chilled bowl, whip the heavy cream. Stop once stiff peaks form, meaning the cream stands straight up when you lift the beaters. According to Serious Eats, maintaining this structure is what keeps the cheesecake from collapsing.
3. The Assembly and Set
Gently fold the whipped cream into the cream cheese mixture using a spatula. Use a slow, circular motion so you don't deflate the air. Spoon or pipe the filling over the crusts. Smooth the tops with a spatula for a clean finish. Place the pan in the refrigerator for at least 4 hours.
They're ready when the sides feel firm to a light touch.
Troubleshooting Guide
It's totally normal to run into a few hiccups the first time you try this. Most of the time, it comes down to temperature. If your cream cheese was even slightly too cold, you might see lumps. If your cream was too warm, it might not hold its shape.
Lumpy Filling Fix
This happens when the cream cheese isn't fully softened. Don't panic. You can gently warm the mixture over a double boiler for 30 seconds or pulse it briefly with a hand mixer on low before you add the whipped cream.
Too Soft Filling
If your cheesecake doesn't set, it's usually because the heavy cream wasn't whipped enough or the fridge wasn't cold enough. Let them sit for another 2 hours. If they're still runny, you can pop them in the freezer for 30 minutes to jumpstart the setting process.
Crumbling Crust Fix
A crumbling crust means there wasn't enough butter or the crumbs weren't pressed down hard enough. Next time, really lean into that flat bottomed glass. For this batch, just top them with extra berries to hide the cracks.
| Problem | Root Cause | Solution |
|---|---|---|
| Lumpy filling | Cold cream cheese | Brief low speed mix |
| Runny center | Under whipped cream | Freeze for 30 mins |
| Crust falls apart | Not enough pressure | Press harder with a glass |
Preservation Secrets
Keep these Mini No Bake Cheesecakes in a sealed container in the cooler. They stay fresh for about 3 to 4 days. If you're making these for a party, I usually prep them two days early so the flavors have time to meld.
For long-term storage, you can freeze them. Place the cheesecakes on a tray first to freeze individually, then move them to a freezer safe bag. They'll last up to 2 months. To eat them, just move a few to the fridge for a few hours.
To avoid waste, if you have leftover graham cracker crumbs, mix them with some melted butter and sugar to make a quick crumble topping for yogurt or ice cream.
Fun Flavor Variations
The beauty of this recipe is how easy it is to tweak. If you want something different, you can stir in a tablespoon of lemon zest or a swirl of raspberry jam before you chill them. For those who prefer a baked version, you can check out my baked cheesecakes mini for a denser texture.
Zesty Lemon Twist
Add 1 tablespoon of fresh lemon juice and a teaspoon of zest to the cream cheese mixture. It cuts through the richness and makes the dessert feel lighter.
Chocolate Ganache Swirl
Melt some semi sweet chocolate with a splash of cream. Drop small dots of the chocolate onto the filling and use a toothpick to swirl it in.
Low Sugar Option
Substitute the granulated and powdered sugars with a 1:1 monk fruit sweetener. The texture stays almost the same, though the sweetness is a bit more subtle.
Gluten free Swap
Use gluten-free graham crackers or a crushed almond cookie base. Almond flour works too, but you'll need a bit more butter to hold it together. If you need a bigger crowd pleaser, try these Bites for 24 Servings recipe.
Perfect Complements
When serving these Mini No Bake Cheesecakes, presentation is everything. I love using a variety of berries, like blueberries, raspberries, and sliced strawberries, to add a pop of color. A single mint leaf on top makes them look like they came from a high end bakery.
If you're serving these as part of a larger spread, pair them with a crisp glass of Prosecco or a cold brew coffee. The bitterness of the coffee balances the sweetness of the cream perfectly. They also go great alongside a fresh fruit platter or some light macarons.
Since they're bite-sized, they're a hit at any occasion. Just remember to keep them chilled until the very last second so they hold their shape on the platter. Trust me, the contrast between the cold cream and the buttery crust is what makes this dish a winner.
Recipe FAQs
Can you use a muffin tin for mini cheesecakes?
Yes, a muffin tin is perfect. It provides the necessary structure for individual portions without needing a large pan.
How to assemble these in muffin pans?
Spoon the crumb mixture into lined cups and press firmly. Use a flat-bottomed glass to ensure the base is level and compact before adding the filling.
Is it true that baked cheesecakes are always better?
Not true. No-bake versions offer a lighter, mousse-like texture that is often more refreshing for summer.
What's the trick for removing them without liners?
Dip the bottom of the pan in warm water for a few seconds. This slightly softens the melted butter in the crust, allowing the cakes to slide out easily.
Why do lumps appear in the filling?
The cream cheese wasn't softened enough. Ensure it reaches room temperature before beating it with the powdered sugar to get a glossy finish.
Which pan is needed if you don't have a springform?
Any standard muffin pan works. If you enjoyed the process of layering flavors here, see how we use a similar assembly approach in our Protein Chocolate Muffins.
Mini No Bake Cheesecakes for 12 Servings