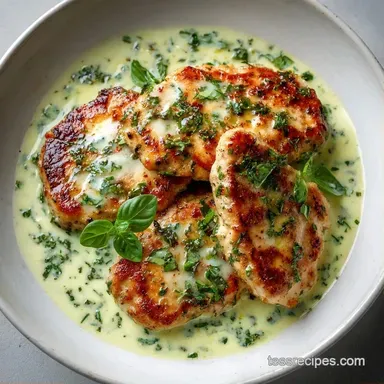
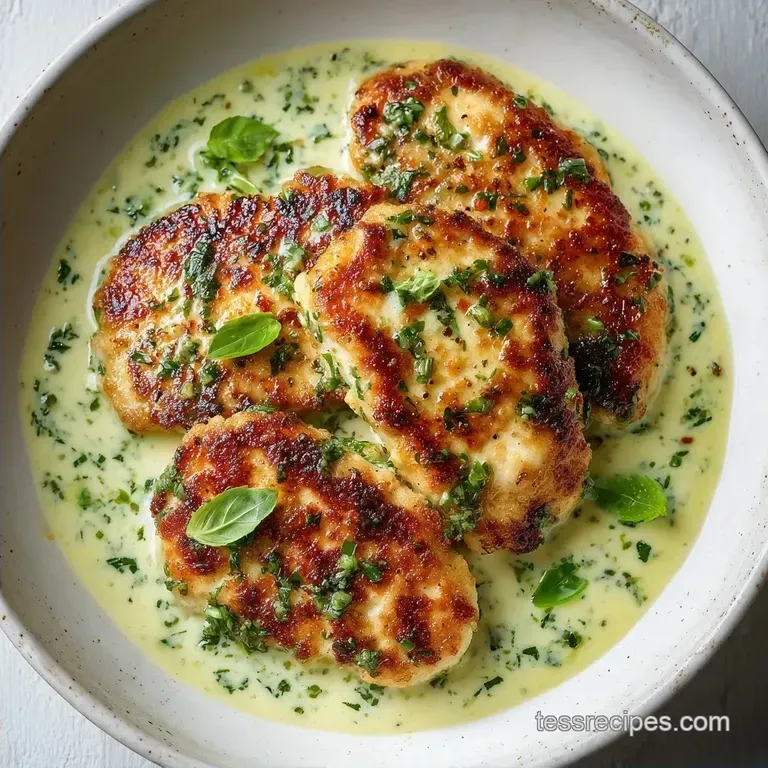
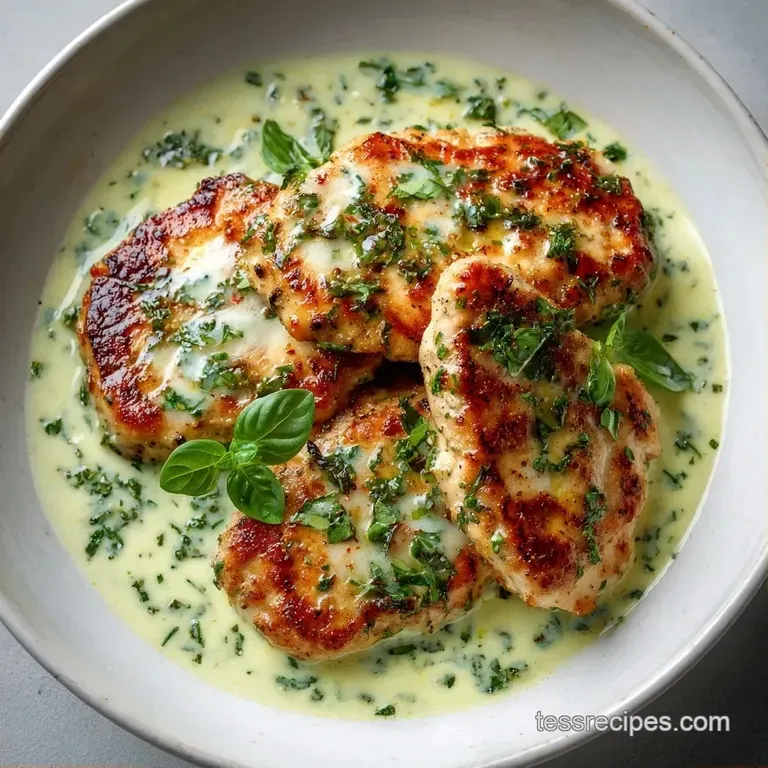
Creamy Basil Chicken Skillet: Rich and Savory
- Time: 10 min active + 20 min cooking
- Flavor/Texture Hook: Velvety sauce with a mahogany colored chicken crust
- Perfect for: Busy weeknight dinners where you only want one pan to wash
- Creamy Basil Chicken
- Avoid Common Cooking Errors
- Quick Recipe Specifications
- Necessary Pantry Ingredients
- Essential Kitchen Gear
- Step by Step Guide
- Fixing Common Sauce Issues
- Troubleshooting Common Issues
- Ways to Change Flavor
- Saving and Reheating Food
- Best Side Dish Ideas
- Final Thoughts on the Process
- Recipe FAQs
- 📝 Recipe Card
Creamy Basil Chicken
The smell of garlic hitting hot butter is enough to make anyone hungry, but for me, it's the scent of a Tuesday night win. I used to struggle with pan sauce chicken; either the meat turned into rubber or the sauce broke into a greasy mess.
I spent a few months just tinkering with the heat levels in my skillet, trying to figure out why my chicken always looked gray instead of golden.
Then I realized the mistake. I was crowding the pan and adding the cream too early. Once I started treating the sear as its own separate event and using the "fond" - those little brown crusts stuck to the pan - the result changed completely.
Now, this is my go to when I need something that feels like a fancy bistro meal but only takes 30 minutes from start to finish.
You can expect a dish where the chicken has a slight crunch from the flour dredging and the sauce is silky and rich. The sun dried tomatoes add a tangy punch that cuts through the heavy cream, and the fresh basil brings it all back to earth. It's a fast, hearty meal that doesn't require a dozen different bowls.
Avoid Common Cooking Errors
Most people treat Creamy Basil Chicken like a stew, simmering the raw meat directly in the sauce. That's a mistake. When chicken boils in cream, it doesn't brown, and you lose that deep, savory flavor that only comes from over high heat contact.
You end up with meat that has the texture of wet cardboard and a sauce that tastes flat.
Another common slip up is adding the fresh basil too early. Basil is delicate. If you simmer it for ten minutes, it turns a muddy brown color and loses its peppery brightness. The trick is to fold it in right after you turn off the heat.
The residual warmth is plenty to release the oils without cooking the life out of the leaves.
Finally,, watch your garlic. Garlic burns in seconds over medium high heat, and burnt garlic is bitter. I always drop the heat to medium before the butter and garlic go in. This gives you a window of about 60 seconds to get that fragrance without crossing the line into scorched territory.
Fast vs. Classic Method
| Feature | Fast One Pan | Classic Braise | Impact |
|---|---|---|---|
| Total Time | 30 minutes | 1.5 hours | Saves over an hour |
| Texture | Seared & Velvety | Soft & Tender | More contrast in fast |
| Tool Count | 1 Skillet | Pot + Oven Dish | Much easier cleanup |
Quick Recipe Specifications
When making Creamy Basil Chicken, the timing is tight. You have 10 minutes for prep, which mostly involves slicing the chicken and chopping the basil. The actual cooking takes 20 minutes.
If you spend too long prepping, your chicken might sit in the flour too long and get gummy, so get your mise en place ready before you turn on the stove.
The goal is a total time of 30 minutes. This is a high protein meal, and the heavy cream provides a rich mouthfeel that makes a small portion feel filling. Because we are using thin cutlets, the cooking time is drastically reduced compared to whole breasts, which often dry out on the outside before the center is safe to eat.
According to USDA FoodData, chicken breast is a lean protein, which is why the addition of butter and cream is so helpful here. It prevents the lean meat from feeling dry and adds a level of satisfaction that keeps you full longer.
Necessary Pantry Ingredients
To get the best result with Creamy Basil Chicken, use a heavy bottomed skillet. A stainless steel pan is ideal because it creates the best brown bits for the sauce, though a non stick pan works if that's all you have.
The Protein Base
- 1.5 lb (680g) boneless skinless chicken breasts, sliced into thin cutletsWhy this? Thin cuts cook evenly and fast
- 1/2 cup (65g) all purpose flourWhy this? Creates a crust and thickens sauce
- 1 tsp garlic powderWhy this? Adds depth to the crust
- 1 tsp saltWhy this? Essential for flavor penetration
- 1/2 tsp black pepperWhy this? Adds a subtle bite
- 2 tbsp (30ml) olive oilWhy this? High smoke point for searing
The Creamy Sauce
- 3 tbsp (42g) unsalted butterWhy this? Adds richness and carries garlic flavor
- 4 cloves garlic, mincedWhy this? Fresh punch of flavor
- 1/2 cup (80g) sun dried tomatoes, drained and choppedWhy this? Concentrated acidity and sweetness
- 1 1/2 cups (350ml) heavy creamWhy this? Creates the velvety body
- 1/2 cup (50g) grated Parmesan cheeseWhy this? Adds salt and thickens the emulsion
- 1/4 cup fresh basil leaves, chiffonadeWhy this? Fresh, herbal finish
- 1/2 tsp salt (for the sauce)
Substitution Guide
| Original Ingredient | Substitute | Why It Works |
|---|---|---|
| Heavy Cream | Full fat Coconut Milk | Similar thickness. Note: Adds coconut flavor, less "Italian" |
| Parmesan Cheese | Pecorino Romano | Similar salt/body. Note: Much saltier, reduce added salt |
| Sun dried Tomatoes | Fresh Cherry Tomatoes | Fresh acidity. Note: Need to cook longer to burst |
| All purpose Flour | Cornstarch | Better browning. Note: Thinner crust on the meat |
Essential Kitchen Gear
You don't need a professional kitchen for this, but a few specific tools make it smoother. I recommend a 12 inch skillet. If the pan is too small, you'll have to crowd the chicken, which drops the temperature and prevents that mahogany crust from forming.
A whisk is non negotiable for the sauce. If you use a spoon, you might leave clumps of Parmesan in the cream. A whisk ensures the cheese integrates fully into the fat, creating a glossy, smooth finish. For the basil, use a sharp chef's knife.
A dull knife will bruise the leaves, turning them black before they even hit the pan.
Chef's Note: If you don't have a whisk, a fork can work in a pinch, but you'll need to be much more aggressive with your stirring to keep the sauce from separating.
Step by step Guide
Let's get into the process. The key to this Creamy Basil Chicken is the sequence of events. Don't rush the sear, and don't overheat the cream.
Phase 1: The over High heat Sear
- Combine flour, garlic powder, salt, and pepper in a shallow bowl. Coat the chicken cutlets evenly, shaking off any excess flour so you don't end up with a paste in the pan.
- Heat olive oil in the skillet over medium high heat. Add chicken and sear for 3–5 minutes per side until a mahogany colored crust forms.
- Remove chicken to a plate and set aside. Note: Letting them rest here keeps them juicy.
Phase 2: Building the Flavor Base
- Reduce heat to medium. Add butter to the same pan, scraping up the brown bits (fond) from the bottom. Note: This "fond" is where all the flavor lives.
- Stir in the minced garlic and sun dried tomatoes, sautéing for 60 seconds until the garlic is fragrant but not browned.
Phase 3: Creating the Velvety Emulsion
- Pour in the heavy cream and bring to a gentle simmer. Let it bubble for 3–4 minutes until the sauce slightly thickens and coats the back of a spoon.
- Lower the heat to low and whisk in the Parmesan cheese until the sauce is smooth and glossy.
Phase 4: The Final Fold
- Return the seared chicken and any accumulated juices to the pan. Spoon the sauce over the meat.
- Turn off the heat entirely and fold in the fresh basil. Note: Folding it in at the end preserves the bright green color.
Fixing Common Sauce Issues
Even if you follow the steps, things can go sideways. Usually, it's a temperature issue. If the pan is too hot when the cheese goes in, the fat can separate.
Troubleshooting Common Issues
| Issue | Solution |
|---|---|
| Why Your Sauce Separated | If you see little beads of oil floating on top of your sauce, the emulsion has broken. This usually happens if the heat was too high when you added the Parmesan or if the cream boiled too violently. |
| Why Your Basil Turned Brown | This happens when basil is exposed to high heat for too long. Basil contains volatile oils that break down quickly. If you stir it into the simmering cream, it will oxidize. |
| Why Your Chicken Stayed Pale | Pale chicken means your pan wasn't hot enough or you added too many pieces at once. When you crowd the pan, the chicken releases moisture that steams the meat instead of searing it. |
Common Mistakes Checklist
- ✓ Did you shake off excess flour? (Prevents clumping)
- ✓ Did you scrap the fond? (Ensures deep flavor)
- ✓ Is the heat LOW before adding cheese? (Prevents separation)
- ✓ Was the basil added AFTER the heat was off? (Keeps it green)
- ✓ Did you let the chicken rest before adding it back? (Locks in juices)
Ways to Change Flavor
The beauty of this Creamy Basil Chicken is that it's a great base. You can easily pivot the flavor profile depending on what's in your fridge. If you want something more hearty, I've found that adding a handful of spinach at the very end works wonders.
Adding Veggies
You can make this a Creamy Basil Chicken Skillet with Corn and Tomato by adding 1/2 cup of frozen corn during Phase 2. The sweetness of the corn balances the salty Parmesan perfectly.
For a lower calorie version, swap the heavy cream for half and half and add a handful of sautéed mushrooms to bulk up the volume without adding many calories.
Different Herb Profiles
If you're out of fresh basil, you can use a mix of parsley and oregano. However, avoid using dried basil as a direct replacement for the final fold; it has a different, more medicinal taste. Instead, add dried herbs to the flour dredge.
For those who like a bit of heat, a pinch of red pepper flakes added with the garlic creates a lovely contrast.
If you find you have extra time on a weekend, you might prefer a Slow Cooked Dinner approach for other meats, but for this specific recipe, the fast skillet method is superior because it protects the cream from breaking during long heat exposure.
Saving and Reheating Food
Since this is a cream based dish, you have to be careful with storage. If you just throw it in the microwave on high, the sauce will likely split.
Storage Guidelines - Fridge: Store in an airtight container for 3-4 days. - Freezer: I don't recommend freezing this. The cream and cheese often separate and become grainy upon thawing.
Reheating Tips To reheat, place the chicken and sauce in a small pan over low heat. Add a splash of milk or water to loosen the sauce. Cover the pan and heat slowly. This gently brings the fat back into the emulsion without scorching the bottom.
Once warm, add a few fresh basil leaves to wake up the flavor.
Zero Waste Tips Don't throw away the basil stems! They actually hold a lot of flavor. Toss them into a pot of boiling water or a stock pot when making homemade chicken broth.
Also, if you have leftover flour dredge, don't use it for the next batch of chicken for safety reasons, but you can save the sun dried tomato oil from the jar to sauté your vegetables for another meal.
Best Side Dish Ideas
Because the sauce is so rich, you need sides that can either soak up the liquid or provide a sharp contrast. I usually go for something acidic or starchy.
The Starchy Route Pasta is the obvious choice. Fettuccine or linguine works best because the wide noodles hold onto the velvety sauce. If you're avoiding pasta, a bed of sautéed spinach or roasted asparagus provides a great earthy balance.
The Fresh Route A crisp side salad with a lemon vinaigrette helps cut through the heaviness of the cream. For a more cohesive meal, I love serving this alongside my Mozzarella Bruschetta. The toasted bread and fresh tomatoes mirror the flavors in the chicken while adding a necessary crunch.
The Low Carb Route If you're keeping things light, serve the Creamy Basil Chicken over cauliflower mash or zoodles. The richness of the sauce makes the vegetables feel much more indulgent.
Final Thoughts on the Process
Getting this Creamy Basil Chicken right comes down to respecting the heat. When you see that mahogany crust forming on the meat, you know you've won the first half of the battle. That sear is what separates a home cooked meal from something that tastes like it came from a professional kitchen.
Remember to keep your heat low when the cheese goes in, and never, ever simmer your basil. If you stick to those two rules, you'll have a dish that is consistently silky and flavorful. It's a reliable, fast, and hearty meal that proves you don't need fancy equipment to get a high end result.
Next time you're staring at a pack of chicken breasts and wondering what to do, give this Creamy Basil Chicken a shot. It's an efficient use of time and one of the most satisfying meals you can make in a single pan. Trust the process, watch your garlic, and enjoy the results.
Recipe FAQs
How to make this creamy basil chicken skillet?
Coat chicken cutlets in seasoned flour and sear in olive oil. Sauté garlic and sun-dried tomatoes in butter, simmer with heavy cream, stir in Parmesan, and fold in fresh basil after turning off the heat.
Is this creamy basil chicken skillet easy for beginners?
Yes, it is very straightforward. It takes only 30 minutes from start to finish and uses a single pan, making it an ideal quick family meal.
Is this an Italian style basil chicken recipe?
Yes, it uses classic Italian flavors. The combination of Parmesan, fresh basil, and garlic creates a rich, authentic Mediterranean profile.
What makes this the best way to prepare creamy basil chicken?
Searing the chicken first to create a mahogany crust. This creates a deep flavor foundation and prevents the meat from becoming soggy when returned to the sauce.
Can I add corn and tomatoes to this skillet?
No, stick to the listed ingredients. Adding corn would alter the intended flavor profile and may affect the thickness of the cream sauce.
Why did my basil turn brown?
You likely added the basil while the sauce was still simmering. Fold in the fresh basil only after the heat is turned off to prevent the volatile oils from oxidizing.
Why did my sauce separate into oil beads?
The heat was too high when you added the Parmesan. Lower the heat to low before whisking in the cheese to ensure the emulsion remains smooth and glossy.
Creamy Basil Chicken